How can we help?
-
General Articles
- How To Point A Domain or Sub-Domain To WordPress
- How To Customize Membership Settings
- Connecting Your Instagram Business Account to the Social Planner Social Media Tool
- How To Use The Universal Search Feature
- GDPR Compliance Information
- Editing Pending and Processing Bulk Actions
- List of Custom Values
- How to Create and Use Custom Values
- Understanding Domains
- Setting Time Zones
- Understanding Time Zones
- Account Settings Overview
- How To Use The Dashboard
-
Workflows
- How to Set Up Email/SMS Notification When An Action Occurs Using Workflows
- Membership Triggers Overview for the Workflow Builder
- Using a Workflow For Membership Log In Notifications
- How To Use Webhooks in Workflows
- Customizing Delivery Timeframes Within Workflows
- Using a Workflow and Smart List To Track Failed SMS Contacts
- Workflow Abandoned Cart Template
- How To Use Workflows to Assign Users to Leads
- How To Use Multiple Triggering Events in Workflows
- How To Set Up Automated Calls And Voicemail Drops in a Workflow
- Workflow Contact Attribution Variables
- How To Move Actions in the Workflow Builder
- Workflow Recipes
- Using the Conversion List for Google Ads with Triggers and Workflows
- Bulk Actions - Campaigns and Workflows
- Using the Contact Changed Workflow Trigger
- Using the Wait Action in the Workflow Builder
- List of Workflow Triggers
- List of Workflow Actions
- How to Import Campaigns into Workflows
- How To Use The "Go To" Function in Workflows
- How To Use The Course Completed Workflow Trigger
- Facebook Conversion API Trigger in Workflows
- Using the Edit Conversation Action in Workflows
- How to Duplicate or Copy a Workflow
- What's the If/Else Conditional Event and How to Use It in Workflows
- How And When To Use The Event Start Date In Workflows
- How to Organize Your Workflows Into Folders
- Checking the Status of Workflows
- Using the History Tab in Workflows
- Customizing Your Settings in Workflows
- How to Create and Use Workflows
- Show all articles ( 17 ) Collapse Articles
-
Contacts
- How The Sticky Contact Feature Works
- How To Create and Use SMS And Email Templates
- How To Create and Edit Smart Lists
- Contacts Overview
- Using the Bulk Action Features
- How to Allow or Prevent Duplicate Contacts
- Tags Overview
- How To Add a Tag to New Contact List Import
- How To Import Contacts
- How To Build, Manage and Use Manual Actions in Campaigns
- Bulk Actions - Pipeline Change
- Bulk Actions - SMS
- Bulk Actions - Email
- Bulk Actions - Add or Remove Tags
- Bulk Actions - Deleting Contacts
- Bulk Actions - Import and Export Contacts
- Bulk Actions - Merge Duplicate Contacts
- How to Navigate Contact Records
- How to Restore Deleted Contacts
- Bulk Actions - Sending Review Requests
- Using The DND Feature
- Show all articles ( 6 ) Collapse Articles
-
Conversations
-
Calendar
- How To Set Up Calendar And Appointment Booking Triggers
- How to Add Facebook Pixel to Survey, Forms & Calendars
- How To Update Cancellation and Reschedule Links For Your Calendar
- Calendar Sync Options
- How to Utilize the Calendar
- How To Create and Utilize Teams With Your Calendar
- How to Create and Edit an Unassigned Calendar
- How To Mark Appointment Status as Invalid Using Triggers
- What To Do If you Get the Google Calendar Writer Access Error
- How to Integrate A Calendar Using Calendar Bridge
- Calendar Color Codes
- How To Block Off Time In A Calendar
- How to Override Calendar Availability
- Outlook Calendar Integration
- Google Meet Calendar Integration
- How to Copy or Duplicate a Calendar
- How to Disable and Enable Calendar Service
- Show all articles ( 2 ) Collapse Articles
-
Social Media
- Using the Social Planner Social Media Tool
- Creating Posts in the Social Planner Social Media Tool
- How to Connect to Your Facebook Group for Use in the Social Planner
- How to Connect to Your Facebook Page for Use in the Social Planner
- How to Connect to Your Google My Business Page for Use in the Social Planner
-
Opportunities
-
Funnel Builder
- How To Activate The One-Click Purchase In Your Funnel Step
- How To Use Forms, Surveys And Calendars In Funnels
- How To Add A Subscription Product To Your Funnel
- How to Set Up a Subdomain for Memberships
- How to Connect Your Domain to a Funnel or Website
- How To Add A One Time Product In The Funnel Builder
- How To Upload and Utilize A Favicon
- How to Change a Logo in the Funnel or Website Builder
- How To Upload Images and Use the Media Library
- How to Setup and Configure a New Domain or Subdomain
- How To Import Your Funnels from ClickFunnels
- How to Create and Use a Coupon/Promo Code - Two Step Form
- How to Add A Facebook Pixel to a Funnel
- Customizing Your Funnel and Website for Mobile and Desktop Views
- How To Use Time Delay In The Funnel and Website Builder
- How To Set Up Payment Plans In Funnels
- Funnel and Funnel Builder Overview
- How to Customize the Navigation Bar in Your Funnel's Mobile View
- Card Authorization for Subscription and Payment Plans
- Split Testing in Funnels
- How to Create and Use a Coupon/Promo Code - One Step Form
- Implementing Funnel Best Practices
- Using a Video Element in the Funnel Builder
- How To Use an Image Element in the Funnel Builder
- How To Upgrade from V1 to V2 Funnels
- How To Clone and Share Funnels
- Converting Funnel Steps and Website Pages Within Your System
- Customizing Funnel and Website Colors
- Show all articles ( 13 ) Collapse Articles
-
Forms
- How To Locate Survey and Form Answers
- How To Build, Edit & Utilize Forms
- How To Build, Edit And Utilize Surveys
- How To Use File Upload Custom Field in Forms and Surveys
- Signature Custom Field in Forms and Surveys
- How To Submit Mock Data for Forms and Surveys
- How To Customize a Form Or Survey
- How to Add or Remove Logos for Forms
- How to Look Up Form Attribution
- Viewing Chat Widget Submissions
- Understanding Automatic Country Detection in Forms
- Understanding the Difference Between "Submitted" and "Purchased" in Order Forms
-
Email & SMPT
- Integrating Gmail for SMTP
- How To Add a 3rd Party SMTP Account
- How to Create or Edit Your Email Signature
- "Add This Event To Your Calendar” Custom Values
- Setting Up SMTP Providers
- Forwarding Address and BCC in Email Setup
- How to Change Unsubscribe Settings in Mailgun
- Mailgun Setup Using GoDaddy
- Test Email Error Troubleshooting
- Mailgun Setup - Overview
- SendInBlue Setup
- Setting Up Replies in Mailgun
- Setting up Mailgun in Cloudflare
- How To Use the Email Builder
-
Phone
- How to Use the Dialer Feature for One-Time Outbound Calls
- How Inbound Call Routing Works
- How To Set Up Automated Calls And Voicemail Drops Within Your Campaigns
- Setting Up a Voicemail Drop and Voicemail Drop FAQs
- How To Convert Voicemail Drop Files into MP3 or WAV
- How To Add Voicemail Forwarding and Transcription For A Twilio Number
- How to Delete a Twilio Phone Number
- Complete Twilio Setup
- How To Record Calls And Listen To Recordings
- Understanding Twilio Numbers
- Whisper Message
- Options within the Dialer
- Twilio Error Messages
- Call Tracking
- Twilio Setup and Compliance for Australia Users
- Twilio Setup and Compliance for UK Users
- How to Use SMS and Phone Number Validation
- How to Use SMS and Phone Number Validation
- Twilio Caller ID Setup
- Show all articles ( 4 ) Collapse Articles
-
Websites
- How To Create A Custom Website
- How To Create and Add a Chat Widget to Funnels and Websites
- How To Create and Add a Chat Widget to Funnels and Websites
- How to Add Facebook Pixel to Your Website
- How To Create and Update Global Sections
- Understanding URL Paths
- How To Add a Privacy Policy and Cookies Pop Up
- How To Add Hyperlinks to Websites And Funnels
- How To Redirect Domains (from www to non-www) - Google Domains
- How to Transfer a Domain to Cloudflare
- How To Redirect Domains in Cloudflare (for non-www. and www.)
- How To Add a Chat Widget to a Wordpress Site
- How to Setup Your XML Sitemap
- How to Add a Meta Tag for Google Search Console Domain Verification
- How To Configure The Buttons on Your Website
-
Integration & Widget
- How To Integrate Your Facebook Account
- How To Integrate A Stripe Account
- Integrating with Google
- How to Update Facebook Page Selection & Permissions
- Quickbooks Integration
- Zoom Integration
- Instagram Direct Messaging Integration
- How to Integrate and Use Paypal
- Wordpress Plugin for Chat Widget
- How to Import Products From Stripe
- Shopify Integration
- Mapping Facebook Form Fields
- Local Services Ad - Reserve with Google Integration
-
Webhooks
-
Account Managment
-
Reputation Management & Reviews
-
Memeberships
- How to Build and Edit an Offer in Memberships
- How to Create and Edit Posts in Memberships
- How to Create and Edit Categories in Memberships
- How To Customize The Membership Welcome Email
- Membership Products and Offers Overview
- How To Connect Course and Funnel Checkout
- Membership Triggers Overview
- How To Setup Drip Content for Subcategories in Memberships
- How To Add A Customer to Your Membership Area, Course or Offer
- How To Use Membership Themes
- How to Manually Grant Access to Memberships
- How To Add a Chat Widget to your Membership Section
- How To Create A Membership One-Click Upsell
-
Campaigns
- Articles coming soon
-
Triggers
- Articles coming soon
-
Troubleshooting
-
Miscellaneous
- Articles coming soon
-
Payments
- Articles coming soon
-
Reporting
- Articles coming soon
< All Topics
Print
How To Customize Membership Settings
Posted
Updated
ByMatt Quinn
When using the Membership section, you can customize various settings and features to make the Membership experience work for your users exactly as you wish.
Step 1: Accessing the Settings
- Navigate to Sites > Membership
- Here you can access “Site Details”, “Custom Domains”, and “Email Settings”

Step 2: Customizing the Settings
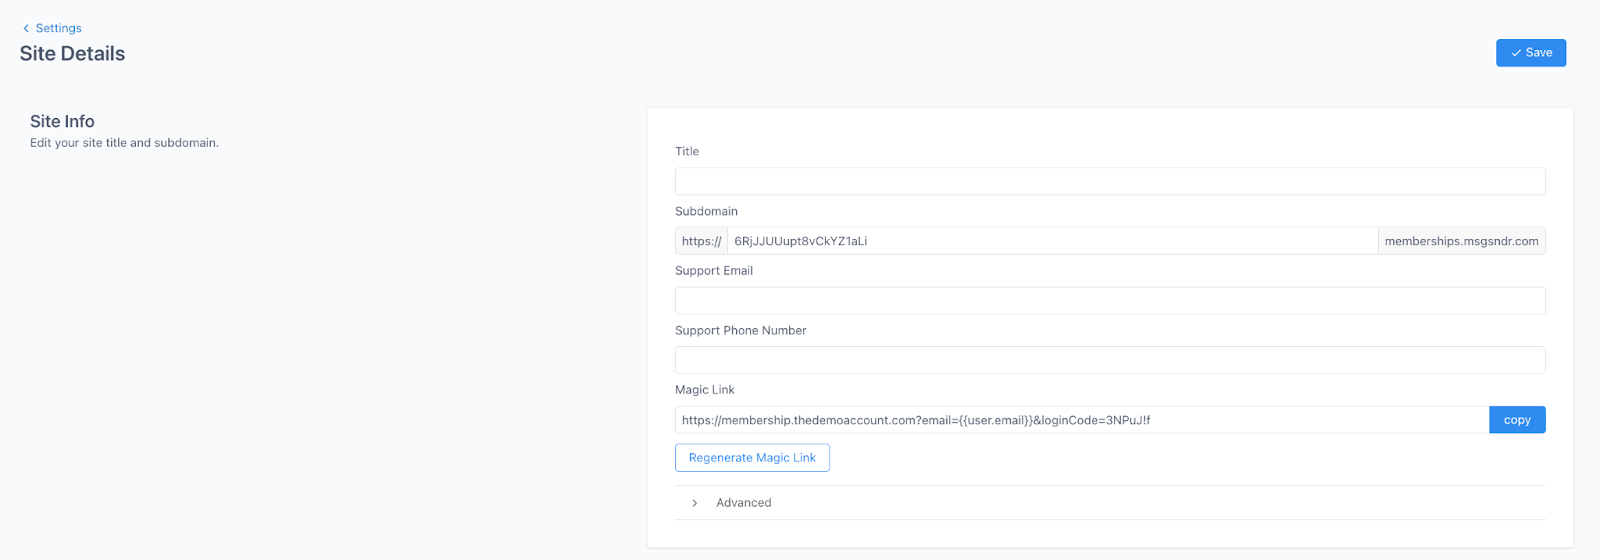
- Click into “Site Details” to update Site Info, Branding, and Builder Settings.
- Site Info: Add your site title, subdomain, support information, and any custom code.
- Branding: add a logo and favicon
- Builder Settings: toggle on or off the download video option
- Click into “Custom Domains” to add a custom domain.

- Click into “Email Settings” to update email settings for the welcome and drip email.
- Toggle on or off the option to automatically send a welcome email when someone completes an offer checkout
- Toggle on or off the option to automatically send an email when drip category is available

- Save any changes you make before leaving the Settings sections.
Table of Contents